Dear Pat and Brad: I love my older home, but it’s drafty and uncomfortable at times. What can I do to reduce drafts that won’t cost me an arm and a leg? – Cris
Dear Cris: This is a common problem, particularly in older homes. In many homes, about half of the conditioned air leaks to the outside every hour. The good news, especially if you don’t want to spend a lot of money, or if you’re hesitant to invite contractors into your home right now, is that you can seal air leaks on your own with a little time and effort.
Here are three steps to get you started. Keep in mind, there’s much more to learn about sealing your home than we can cover in this article, so consider researching trusted websites for additional tips and tutorials.
Step 1: Find the leaks
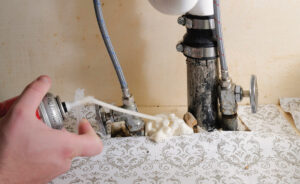
The first step is a thorough visual search of the interior and exterior of the home. Look for gaps and holes in exterior walls, flooring and ceiling. These will often occur where different building materials meet, such as the top of cement foundation walls or around windows and doors. Another common source of air leaks is where pipes or wiring penetrate a wall, floor or ceiling. Ductwork located in unheated crawl spaces or attics can also contain air leaks.
Exterior doors and windows that open deserve your attention. Open each door or window and place a dollar bill between the door or window sash and the frame. If you can pull the bill out easily when the door or window is closed again, the seal is not tight enough. Also, a window isn’t sealed sufficiently if it rattles when it’s closed during windy days.
The best way to find all air leaks is to hire an energy auditor to do a blower door test. The blower door is a large fan that is mounted in a doorway to depressurize the house. The auditor can then find the leaks and may even be able to recommend ways to seal them.
It’s also possible to conduct your own whole-home pressure test. The Department of Energy provides detailed instructions at http://bit.do/sealing.
Step 2: Gather the materials you’ll need
Here’s a quick list of materials to get you started:
- Caulk: You’ll need a caulk gun ($4+) and caulk ($4 to $10). We recommend indoor/outdoor waterproof silicone or latex caulk that is water-soluble until it cures and is paintable when dry.
- Expanding spray foam: One can typically costs $4 to $6. This is an effective way to plug leaks, but keep in mind, it’s a messy job.
- Weather stripping: Prices vary depending on type and length of the materials, but there’s a wide variety of weather stripping options made of vinyl, metal and felt, or open-cell foam that works for most situations.
- Pre-cut foam socket sealers: You can typically purchase a pack of 24 sealers for about $3.
- Chimney plug balloon: Prices range from $50 to $90. You may need a chimney plug balloon if your chimney flu doesn’t seal well. Buy a square or round one to match the shape of your chimney flu.
- Adhesive plastic window insulation sheets: Prices range from $2 to $14 depending on size. You may need insulation sheets later in the year for windows that can’t be sealed and don’t have storm windows.
Step 3: Do it!
If you are unfamiliar with how to apply any of these materials, we recommend watching online tutorial videos. Sealing air leaks is one of the best ways to boost your home’s energy efficiency. Whether you’re a DIY pro or novice, with a few simple steps (and low-cost materials), you’ll be well on your way to a sealed, more efficient home.